Behind the scenes of Venom
Sink your teeth in.
An interview with Venom developer Taiho Yamada
 Hi, I’m Taiho, product designer of Venom, and here are a few things you should know about me…
1. I have always loved synthesizers.
Hi, I’m Taiho, product designer of Venom, and here are a few things you should know about me…Even as a small child in the 1970s, they captured my attention. There are certain songs that I loved back then, but at the time I didn’t know why.. Of course, when I listen to them now… there are synths all over them. I still remember the day that my first-grade teacher put on a 45 single of Hot Butter’s “Popcorn” and let us dance to it. Imagine sheer pandemonium with a roomful of tiny humans! And six-year-old-me was quite happy that she decided to play it twice.
2. My dad is cool.
One day when we were getting out of the car to visit my grandparents, my dad and I heard the sound of someone playing a synthesizer from an open window of a nearby apartment building. The sound twisted and morphed and made music in ways I’d never heard before. My dad asked me if I liked it and I said, “Yes.” That one word changed the course of my life.
A short time later, I had my first analog synthesizer. My dad bought it for me, but I’m pretty sure that he secretly played with it after I’d gone to bed. It was a budget synth, but designed by the master himself, Bob Moog. On this instrument, I learned about Oscillators, Filters, LFOs, Envelopes, Pitch Wheels, Mod Wheels, Portamento, and Sync. I was nine years old.
3. Andromeda is a galaxy of sound.
Flash forward past many years of learning synths, sound design, sampling, and sequencing, and by a strange set of coincidences, I find myself working at a really great company, helping to make all kinds of synthesizers. In fact, it just happens to be my dream job, and I enthusiastically join my friends in the creation of every synth ever engineered there.
But one of those synths turned out to be extra special… It brought us back to those childhood memories where synthesizers offered the potential of sonic explorations no one had ever heard before. I was so lucky to be a part of the development team for this 16-voice, real analog beast. As designers, we were able to collect everything we loved about our favorite synths and squeeze it all into this one awesome package.
4. Hmm.
There was just one problem with this particular galaxy of sound. Few mortal human beings could actually afford it.
5. Venom is born.
Fast forward a few more years, and I somehow find myself working at another really great company making synths. Like before, this company isn’t known for making synths when they hire me, but they have some experience with the Atmel Dream DSP, which happens to be really good at playing back piano samples. I was perfectly content with this…
Until one day I realized that using new algorithms, we could get the DSP to play back samples of classic analog waveforms with Pulse Width Modulation/Waveshaping, FM, and Oscillator Sync. Then I started thinking about the 2- and 4-Pole Multimode Resonant Filters we could implement. And that led to thoughts about Envelopes, tempo-synchronized LFOs, and a giant Modulation Matrix where every element could be interconnected. And at that point it was too late. The dam had burst.
Since then, it’s been a long journey both wonderful and terrifying. There’s a lot of blood, sweat, and tears behind every Venom that we build. In this blog series, I’ll give you a look behind the scenes of the making of Venom, as well as some power-user tips and tricks for getting every last morsel of tasty sound out of this beautiful synthesizer. Of all the synths I’ve had the pleasure to work on, this one is the closest to my heart, and I look forward to sharing the reasons why.
By the way, my mom is cool too. Hi Mom.
BEHIND THE INDUSTRIAL DESIGN
 I originally thought Venom would be white.
That seems like an odd thing to say, considering that Venom actually is painted white, but I think you’d be amazed at the incredible journey it took to finally get there. In this blog post, I’m going to pull back the curtain a bit on the design of Venom, and give you a peek at what it’s like to work with a group of colleagues who are so passionate about synthesizers. Sometimes, gaining consensus between various viewpoints can be quite frustrating, but after all of the “spirited” debates, the end result is a finished product that’s the best it can be.
Onward with the tale…
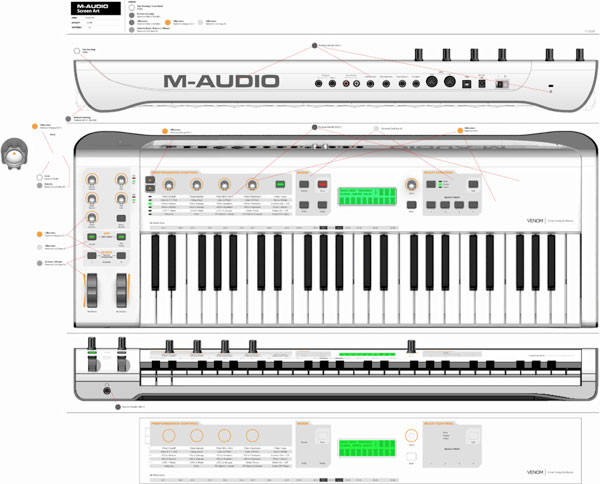
In the beginning, I decided that Venom really needed to look like M-Audio’s KeyStudio 49i.
 I’m kidding! This rendering was just a mockup to show the Industrial Designers the relative placement of various physical features on the unit. At that point, my only concerns were about maintaining the general functionality of the user interface and the overall ergonomics. I always leave it up to the ID professionals to make the final product look original and cool. To kick things off, I try to convey my basic ideas as clearly as possible, and I find it easier to do so by starting with a design that everyone is familiar with already.
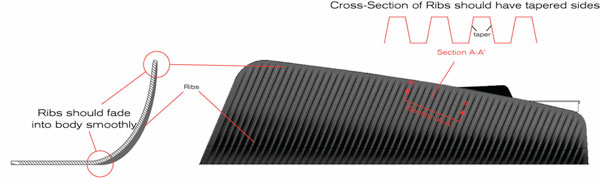
 We started off the real ID process by discussing the aesthetics of Venom. The synth engine combines old-school waveform muscle with modern digital sensibilities, so we talked in abstract terms about how a “grille” might suggest that kind of power under the hood. We took this concept and applied it most generously to the side panels, but it’s also visible in other aspects of the design, such as the knobs.
As the outer shell, knobs, wheels and even the buttons took shape, attentions turned to the color scheme of the product. Since purple has been pretty rare on synths historically, and because Avid was in the process of adopting that particular shade in its branding, we tried purple out as our main color.
 The problem with this purple was that the iridescence in the paint caused it to turn pink under certain lighting conditions, which we felt would not really help us reach our target audience.
This led us to black; the old standby. When this color scheme finally seemed to stick, the discussions turned toward the accents and highlights. We went through a rainbow of colors trying to decide on which combination was most complimentary to the design, but one of my favorites wound up having an almost monochromatic feel, matching the black chassis with grey and silver trim. To me, it felt like a callback to Bob Moog’s old module style, but with a Nine Inch Nails kind of twist.
 Too bad no one else seemed to like that one… There were a couple more interesting versions with green and blue highlights, but nothing held until I pushed for a black and orange combination as a sort of ARP tribute. The team was relatively happy with this one for quite some time. In fact, we went through two versions in order to get the shade of orange right.
![]() All was well and good until a competitor beat us to market with a similar color scheme. That’s always a danger when you’re developing a synth over a period of years, but fortunately in this case we still had enough time to change course. So we returned to the white chassis, and the debate over the top panel silkscreen colors came back with renewed vigor. (As an added bonus for those of you with sharp eyes, you’ve probably noticed that the Venom logo has also changed four times in the midst of all this. That’s a whole other story…)
All was well and good until a competitor beat us to market with a similar color scheme. That’s always a danger when you’re developing a synth over a period of years, but fortunately in this case we still had enough time to change course. So we returned to the white chassis, and the debate over the top panel silkscreen colors came back with renewed vigor. (As an added bonus for those of you with sharp eyes, you’ve probably noticed that the Venom logo has also changed four times in the midst of all this. That’s a whole other story…)
 This long iterative process might seem quite chaotic, but for good design you have to validate your assumptions with other stakeholders at every step. We start with internal feedback on things like feasibility and cost, and position in our target market, and then we reach out to our retail partners and get opinions from a select group of sales professionals. Finally, we listen to our customers and do our best to implement suggestions, and if it’s not possible in the current product, we definitely put it on the list of issues to address in the next one. In fact, that goes for the entire design, not just the styling of the outside surface.
If all goes according to plan, you finish up with an elegant design that has been extensively reviewed and not only meets the functional needs of synth enthusiasts, but also elevates to the next level and inspires.
SOUND DESIGN TIPS AND TRICKS KNOW YOUR OSCILLATORS
 It all begins with the oscillators… If those don’t sound great, no amount of filtering or effects will ever really be able to fix that. Venom addresses this issue in a clever way, by playing back samples of classic analog waveforms as well as modern digital sources. Sampling allows you to go directly to the oscillators of the best synthesizers and drum machines ever made and easily capture every spectral nuance of their waveforms.
As opposed to mathematical modeling, sampling duplicates the exact waveforms using very little horsepower in the DSP. However, the sample is like a snapshot, and the changes that take place over long periods of time, such as analog frequency drift, are not accurately reproduced. But with the savings in processor power, Venom allows you to reintroduce this behavior (and much more) through a comprehensive set of modulation parameters and sound shaping tools.
Tip 1 – Recreating analog oscillator behavior
The first thing that comes to mind is how the frequency of an analog oscillator drifts over time. It slowly meanders in a seemingly random fashion as the circuit reacts to small variations in temperature and other factors. To quickly add some of this behavior to a Venom sound, turn up the Drift parameter using the oscillator section of the Vyzex editor.
 Drift will add small random variations to the base frequency of each oscillator each time you press a key. It does introduce some nice phasing as the detuned oscillators beat against each other, but Drift doesn’t actually go so far as to continue moving the frequencies around over time. For that, we’ll need to set up some LFO modulations.
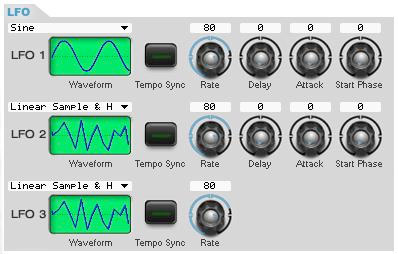
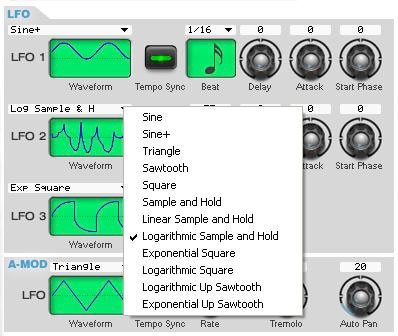
I like to use LFO 2 set to the “Linear Sample and Hold” shape in order to introduce a smooth random modulation as the note is held.
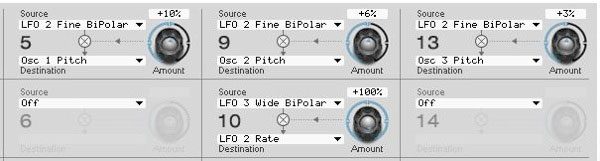 And since you can address each oscillator’s pitch independently, you can really enhance the analog vibe by setting different modulation amounts for each of them. This will cause the frequencies to “fan out” and the oscillators will beat against each other at different rates, but the overall pitch movement will be in the same direction if the modulation routes are all set to the same positive (or negative) polarity.
 To add the finishing touches to our analog frequency drift, I use LFO 3 to modulate the rate of LFO 2. Although the level values of the Linear Sample and Hold are random, the clock timing isn’t, so it’s a good idea to make this additional modulation route in order to avoid hearing pitch variances occurring at regular intervals.
I bet you thought we were finished at this point, but there’s one more important component to recreating analog behavior in the oscillators, and that’s phase. Analog oscillators are always oscillating behind the scenes, and we hear them only when the filter and amplifier are opened (usually by an envelope). This means that the audible starting phase of the waveform is more or less random since you can’t really control the precise timing of when you play a note and reveal the waveform cycle.
Samples on the other hand, tend to always start at the same spot – the beginning. So, in order to simulate phase variance, Venom provides an oscillator Start Mod parameter, which chooses a random spot in the length of the waveform sample to begin playback. As with the Drift parameter, Start Mod applies the effect randomly, and in different amounts, across all three Venom oscillators whenever a voice sounds.
Tip 2 – Using the Waveshaper to generate PWM
There are some other tricks to bringing more traditional analog behavior to Venom’s waveforms. Pulse Width Modulation is one of those essentials that you wouldn’t necessarily expect from a sample, but Venom provides an interesting and ultimately more versatile way of accessing that classic sound. The key is in the Waveshape parameter on Oscillator 1.
Venom’s Waveshaper takes any waveform that you feed it and turns it into a rectangular wave of varying pulse width patterns. The Waveshape threshold parameter determines the overall shape. Any part of the wave that falls above the threshold gets set to full positive, while anything below is set to full negative.
 Since Venom’s waveform samples have a fixed pulse width, we use them instead as a reference plot for the Waveshaper algorithm. On Venom, to make the classic Pulse Width Modulation sound, you actually have to start with a saw wave rather than a square, and as you modulate the threshold up and down, the positive going pulse width becomes thinner and thicker respectively.
Because Venom achieves PWM through a waveshaper algorithm, that function can be applied to every waveform in the oscillator, not just to the square wave like on most analog synths. Some of the more complex Venom waveforms have multiple peaks per cycle at varying amplitudes, so the resulting PWM can even go to 0% on some peaks while not on others. This can make for some very interesting and gritty textures.
Tip 3 – Unusual uses for drum sounds
 Since Venom’s drum samples appear as one-shot waveforms in the oscillators, you can apply algorithmic functions such as the waveshaper to those as well. And changing the threshold takes your kit from a nice rectified distortion sound to complete and utter oblivion… It’s a great effect.
But what I really love is using drums as the source waveform for Sync sounds, which is something you don’t find on a lot of synths outside of the modular world.
Oscillator Sync is generated by resetting the phase of the slave oscillator each time the master oscillator completes a cycle. That way, the slave oscillator takes on the fundamental frequency of the master oscillator while generating new harmonics. By nature of the algorithm, Sync is most interesting when the slave oscillator is set to a higher fundamental frequency than the master, and gets even better when its frequency is being constantly modulated. This creates a shifting set of harmonics over time.
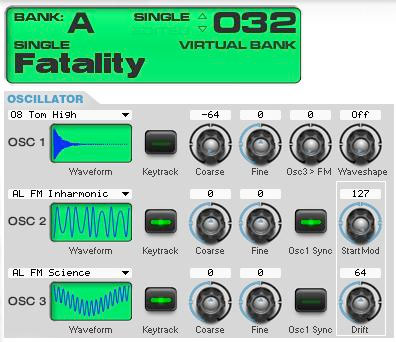
However with a complex master waveform like an analog tom (for example), oscillator Sync causes the slave oscillator to reset many times during the initial attack transient. Then it follows the fundamental frequency in the body of the tom sound as it falls, and finally stops resetting when the drum sample fades out. You can really hear how the sound changes over time if you tune the drum way down. In fact, the sound “Fatality” (A-032 in the preset banks) does exactly that.
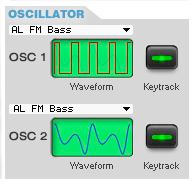
Tip 4 – Using Oscillators 2 and 3 as LFOs
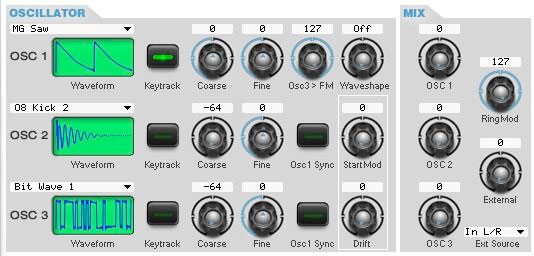 Another interesting use for a drum sound in the oscillator is as a one-shot complex LFO waveform. Venom already provides 4 LFOs, but you can add two more by tuning oscillators 2 and 3 down to sub audio rates and applying them as Ring Mod and FM respectively. The FM route becomes a pitch LFO and Ring Mod becomes amplitude modulation.
Of course you can use the “normal” waveforms as well. Just tune the oscillators down all the way using the Coarse tuning parameter and then force them down even further using Envelope 3 routed negatively to the individual oscillator pitches. This allows you to use any oscillator waveform in Venom’s arsenal as an unconventional and distinctive LFO shape.
Tip 5 – Frequency modulation of Noise
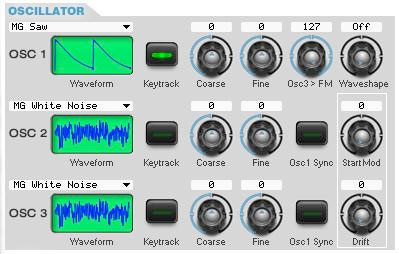 In the analog world, it’s impossible to modulate the frequency of noise because it has no frequency. But in Venom, since the noise is a sample in the oscillator, you can vary the sample rate and change its “pitch/formant” characteristics. Pitching White Noise down starts sounding like Brown Noise, while pitching it up edges into Violet Noise.
This is useful not just for changing the audible timbre of the noise, but also for changing the quality of the result when using noise as a pitch or amplitude modulation source. Normally if a synth gives you a choice of noise color, it’s a set-and-forget parameter, but in Venom you can continuously modulate the White Noise “pitch”, both positively and negatively for dynamic “color” variation.
 Venom’s oscillators were designed to give you the best of both worlds. They can sound alive and analog or precise and digital depending on how you choose to use them. The tips listed here barely scratch the surface of all the sonic possibilities in Venom’s deep synthesis engine. Hopefully you’ll be inspired to explore further on your own, and I look forward to hearing the cool new sounds that you discover.
SOUND DESIGN TIPS AND TRICKS MORE TOOLS FOR SCULPTING YOUR SOUND
In my previous blog we talked about Venom’s oscillators and discussed many of the deeper sound design functions that you can perform with them. Now we’ll talk about the rest of the synthesis engine and how it can shape the waveforms we’ve generated. Oftentimes, people focus on just the oscillators or filters in synthesizers when talking about their character, but the entire voice path is just as important, and every one of those elements works together to make an instrument unique.
Tip 6 – Pre Filter Boost
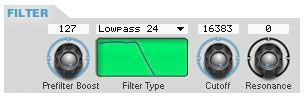
Digital filters clip in really unpleasant ways, so quite often DSP engineers will work to keep the levels low enough by limiting the range of the input signals. Venom, on the other hand, gives you the option to actually turn things up with its Pre Filter Boost parameter. This is only possible because we went a step further and built in a tube saturation limiting algorithm that can be overdriven gracefully. When Venom’s filter is clipped, it generates a nice analog distortion sound that adds to your waveform’s harmonics. It’s one last bonus parameter where you can make additions to the timbre before you start using the filter cutoff to subtract from it.
Tip 7 – Vocal Formants without a Formant Filter
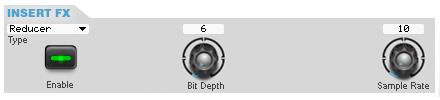 Venom doesn’t have selectable formant filter algorithms, but you can still make those distinctive “talking synth” sounds. Vocal formants can be created by arranging two or more resonant filters in series at specific frequency relationships to each other. Venom only has one main filter, but secondary filters are available in a couple places farther down the signal path. One filter to try is the Auto-Wah on the Insert effect, but strangely enough, the Sample Rate Reduction effect (decimator) also does a really great job in the formant filtering chain. Check out Single Program A106 “Gibberish” for an example of this. It’s not too hard to experiment with cutoff frequencies until you find some relationships that sound vocal.
Tip 8 – Extreme LFOs
 There are tons of LFO options in Venom. Between the three main LFOs, A-Mod LFO, Effects LFOs and the oscillator LFO trick we discussed in my previous blog, there are a myriad of ways to put some interesting motion into your sound. Venom is designed this way because animating different elements of a patch can really give it life, from subtle effects that are more felt than heard, to real sonic fireworks.
 Check out all the options the main LFOs have to offer, from the extended set of 12 wave shapes, to Tempo Sync expressed in musical note values, to envelope-like fade-in settings, to determining the Start Phase position. You can use these parameters to put together some intense modulations, like in Single Program C003 “LFO Mashup”. This patch uses three tempo synchronized square wave LFOs to create a musical pattern by modulating the pitches and levels of the individual oscillators at different note divisions.
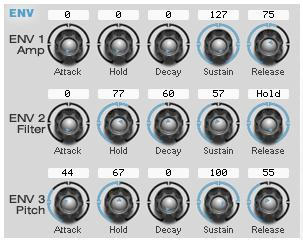
Tip 9 – Hold the Envelopes
Normally, envelopes only have one stage where they stay at the same level for any period of time and that’s the Sustain stage. With Venom, we took the traditional ADSR and added a Hold stage between the Attack and the Decay. This allows you to set up modulations that rise, rest, fall, rest, and fall — depending on the envelope settings and how you play the note, of course.
 For an example, I’ve created a three oscillator program that uses envelopes 2 and 3 to change the individual oscillator pitches, making a sound that moves from one chord to another while a single note is held. Since the Hold stages are set to different times, you can hear one oscillator change frequencies before the other. On the second oscillator I turned up the Decay time which sounds like portamento, or glide, when the envelope plays through that stage.
Tip 10 – Mono Legato Envelope Mode
Mono legato mode was used for a lot of classic synth leads and basses – the Minimoog D always behaved this way, for example. Venom, as a polyphonic synthesizer, only changes to Mono Legato mode under certain circumstances, but will do so automatically. If Venom is set to Mono mode, and Glide is turned on, the envelopes won’t retrigger unless your fingers are fully lifted off the keys between notes.
 (If you weren’t planning on having Glide as a part of your sound, leave the Glide Time parameter set to zero and it won’t get in your way.)
Venom’s deep synthesis engine gives you many interesting and often unusual tools for sculpting your sound. From its chameleonic oscillators and filter, to its dizzying LFO and envelope modulations, Venom provides more than enough options to continue making wonderfully surprising patches for years to come. I look forward to hearing your creations!
SOUND DESIGN TIPS AND TRICKS VENOM COMES ALIVE IN THE MATRIX
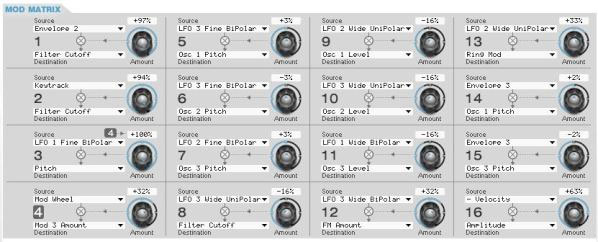
In my previous posts we discussed how to get more out of Venom’s oscillators, filter, LFOs, and envelopes. Now, we’ll take a look at how all those pieces connect together. At Venom’s core is a powerful 16-route matrix that allows you to patch physical controllers and other modulation sources to destinations all over the synth engine. Making good use of these patch points is what really brings a Venom sound to life.
Tip 11 – Max it out
 Unless your goal is to make a very stable sound with a decidedly digital feel (hey, sometimes those are great too), it’s a good idea to visit the modulation matrix and do some creative routing to animate various elements of your patch. You can use LFOs and envelopes to make ear-catching wide modulations, but oftentimes the most useful modulations are quite subtle, like the analog drift modulation we discussed in Part 3 of this series.
But you don’t have to stop with the frequency and phase of the oscillators—you can send analog emulating modulations to the Filter and Amplitude destinations as well. When setting out to maximize a sound, it’s good to think about all the dimensions available to you beyond the basic parameters. Start with pitch, timbre and volume, but then expand your reach to cover such aspects as how the sound varies over time and its perceived placement in space. Venom provides useful tools for sculpting all of these elements.
Actually, this sound is useful for illustrating many different maximization techniques. If you download it from Venomsynth.com, you can explore a variety of modulation applications, including:
- LFO routes crossing destinations in order to create multiple layers of movement
- Using all three envelopes with varying stage values
- Utilizing stereo panning and effects to create space
- Engaging FM and Ring Mod to add texture
- Combining waveforms from different manufacturers to increase timbral variance
- Using all mod matrix routes at once (it’s maxed out!)
Tip 12 – Bipolarity at Its Best
In Venom the modulation routes are bipolar, which allows you to set up modulations in both positive and negative amounts. Some really interesting effects tend to occur when the polarity of a mod route is flipped. For example, you can invert the envelopes to produce negative shapes, have pitches track the keyboard in reverse, or even dynamically change the direction of a saw wave LFO. When you flip its polarity, an “up-saw” LFO becomes a “down-saw” and vice versa. You can get some wild effects if you then put the polarity of the saw LFO under the control of another source, like a sample and hold.
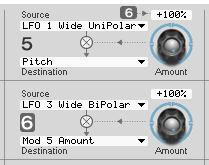
Tip 13 – Modulating Mod Routes
Venom allows you to modulate a modulation route with another modulation route. That’s what lets you set up the basics, like having the Mod Wheel control vibrato (LFO to Pitch). But it also allows you to do the more esoteric stuff like the bipolar sound example above. The rule with modulating mod routes is that you can go two levels deep, but not three. You can’t have a mod route modulate another mod that’s already modulating a mod. (Got that? Right—the whole thing can get pretty complex…) Fortunately, the Vyzex Venom software editor keeps track of how the modulation routes interweave, and will remove any invalid mods from the destination list so you don’t have to worry about them.
 This example shows how Vyzex lets you know at a glance that route 6 is modulating route 5. Other modulation routes are free to target route 5, but they won’t be able to modulate route 6.
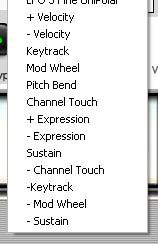
Tip 14 – Scaled vs. Additive
In the modulation matrix you’ll notice that plus “+” and minus “-” signs appear in front of some modulation sources. What does this mean?
 The plus sign is really straightforward. Those denote an additive modulation source, where the modulation value is added to the destination value. (In deference to high school algebra, negative numbers can be added here as well.)
The minus sign however doesn’t necessarily indicate subtraction. Instead, it can mean that the source is multiplicative and will scale downward from the parameter value set in the target, or it could be a negative or reverse modulation. It depends on whether the source with the minus sign is paired with a source with a plus sign or not. If it’s paired, then it’s scaling. If not, then it’s subtraction.
Look at the “Velocity” sources at the top of the pictured source list. Those are a pair that provides scaling, while the “Mod Wheel” entries farther down the list are only additive sources.
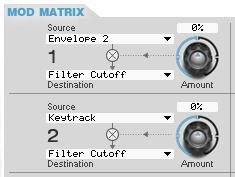
Tip 15 – Need Some Assignable Knobs?
There are two top panel Performance Controls that actually require routes in the mod matrix in order to function. The “Filter Envelope Amount” and “Filter Keytrack” knobs utilize routes 1 and 2 respectively. However, they don’t necessarily need to be assigned that way. You can set up any engine modulation you want in these slots, and the amount of modulation will be controlled by the corresponding top panel knob. Obviously, the top panel labels won’t match what’s happening in the patch anymore if you do this, but in return you’ll be able to create custom performance controls for your sound.
In either modulation route, the top panel knob directly controls the modulation amount through its full bipolar range. If you want a static source, i.e. the knob directly affects the parameter; use a free envelope with no Attack, Sustain set to full, and the Release set to “Hold”. Or, you can set it up to use the knob like a mod wheel, where it might bring in the effect of an LFO.
Venom’s extensive modulation matrix provides much of the versatility found in modular synthesizers for patching synthesis sources and destinations into each other. From the sheer number of routing options available, to the useful mathematical transformations applied to the modulation amounts, Venom provides ample opportunities to shape your sound just the way you want it.